Showing posts with label tanks and magnets. Show all posts

Saturday, 2 March 2013

Salamanders Predators

I have just finished a pair of predators for my Salamanders army.
I'm really pleased with the way these have come out. The paint scheme I use for my Salamanders can be quite tricky for tanks, but it has worked very well with these two. They are also magnetised to allow the different weapon options to be used.
A tutorial about magnetising the main turret is included in this post.
These two can also be stripped down to run as Rhinos when required. Here's one with all the magnetised parts on display:
So far I have completed two Razorbacks, two Predators and a Rhino for this army. I am going to add a Land Raider, which will also be magnetised between Godhammer and Redeemer patterns, and I also have a 2nd edition Razorback to come for my RTB01 Tactical Squad. I will post a tutorial on the Land Raider magnets in next couple of weeks. It is actually looking like it will be quite a bit simpler than the Predators.
Here is a bonus picture of 40k cat inspecting the troops before a recent 3000 point game...
40k cat
....and here is a bonus bonus picture of 40k cat helping me to prepare this post.
40k cat

Monday, 12 November 2012

Predator Turret Magnetisation

Here is how I magnetised the main turret on my predators so that you can choose between the two main weapons easily. I've seen some other tutorials that involve working on the weapons themselves, but I've come up with a really simple way of achieving the same result by magnetising only the turret itself.
The premise of this conversion is simple. If you put the kit together according to the instructions, the only thing that is holding the weapon in place is the fact that the two halves of turret are glued together. If the two turret halves could be magnetised, it would be possible to lift the turret up, change the weapons over and snap the turret back on.

Here's the bottom of the turret. Without modification, there isn't enough plastic around the edge to drill magnets into, so we need to build up the sides with something. I decided to use green stuff.
Once the green stuff is dry, carefully shave it so that the green stuff is flush with the sides on the turret, so that the whole thing will still fit nicely together. This process needs to be repeated for both halves of the turret.
Next, the magnets needed to go in. Although I don't particularly like the red paint technique for marking polarities, it can be very useful for marking magnet positions. The red paint on the magnets shown here will tell us where we need to drill into the green stuff on the other half of the turret if they are pressed together while the paint is still wet.
Once the magnets are in the other half and everything is dry, its time to put the turret together, hopefully with satisfying snap of magnets if you've got everything right.

Here's the finished tank viewed side on. Despite my best efforts to make the two halves of the turret flush, you can see that there's a gap. I don't think that this is too nasty to look at, and it will be less obvious when the tank is painted.
I've magnetised most of the tank using this guide, From the Warp: Magnetising the Space Marine STC, but I decided to try something different for the main turret which I think has been pretty successful. Only one more Predator and a Landraider to go and I can stop gluing magnets to my fingers and do some painting!


Monday, 10 September 2012

Magnetising Predator Sponsons

I've just finished magnetising the majority of the armour in my marine army, and frankly I am glad to see the back of those tanks from my modelling table! Anyway, I wanted to do a quick post about an alternative way of magnetising predator sponsons.

I magnetised the side weapons on the first of my two predators in the "traditional" way. The peg that connects the weapon to the tank is cut off just at the part where it becomes square, and a magnet is mounted there. 
A matching magnet goes on the weapon, and you're finished. A simple and effective way of doing things. However, the weapons are only connected to the tank by a single point, which means they spin around when you pick the tank up generally feel a bit flimsy. This is particularly annoying when you use the lascannons.
For my second predator, I decided to make a more sturdy magnet joint. The weapon peg is cut off at the same point, but this time a piece of sprue is added that gives you space for two magnets.
As you might expect, the next step is to add matching magnets to the weapon. One small change that I made from the previous build was to fill the gap in the weapons with green stuff and sit the magnets flush on top. I found this was more straightforward that trying to sit the magnets in the gap in the weapon, and it meant that it was easy to find enough space for the two magnets to go on with the correct spacing. 
Here's what the tank looks like with the weapon mounted in this way. The lascannon sits quite nicely and won't spin around when you are moving the tank, but the bit of sprue is quite obvious and I decided it needed tidying up a bit. I had a look around on the predator sprues and decided that the battery for the lascannon could be converted quite nicely.
I chopped off one of the strips and tidied it up a bit, before sticking in over the sprue. I think that it improves the look quite a bit without much effort. So there you have it, a quick way of making sturdier predator sponsons. The only downside is that the weapon no longer rotates, but I am quite happy to give that up in return for a model that doesn't fall apart when you move it round the table.

Wednesday, 8 August 2012

Simple Hunter Killer Conversion for Rhinos, Razorbacks and Predators


This is a very simple conversion that you can use to mount a hunter killer missile on a rhino, razorback or predator without sacrificing the storm bolter . The easiest way to mount the hunter killer missile is on the same turret mount as the sbolter, and unless you buy extra components you would have to choose between the two on your model. There is a way of using both using only pieces from the standard kit but it ends up being quite fragile and would not be easy to magnetise.

This conversion uses parts from the standard rhino kit to allow you to mount both in a way that's suitable for use with magnets.  It doesn't look quite as smart as the turret mounted one, but it's quick and effective.

Start by clipping out the three parts of the missile launcher and cleaning them up.
Next, separate the muzzle of the missile launcher from the front of the sensor housing with a scalpel.
Clean up the part that you've cut and glue the missile launcher together.
Next, clean up the front part of the sensor and glue it to the back half. It's best to glue it the opposite way up to the way that you'd do it if you were mounting it normally. To get a good fit you may need to file the "peg" off the the back part of the sensor that would normally fit into the slot on the front part.
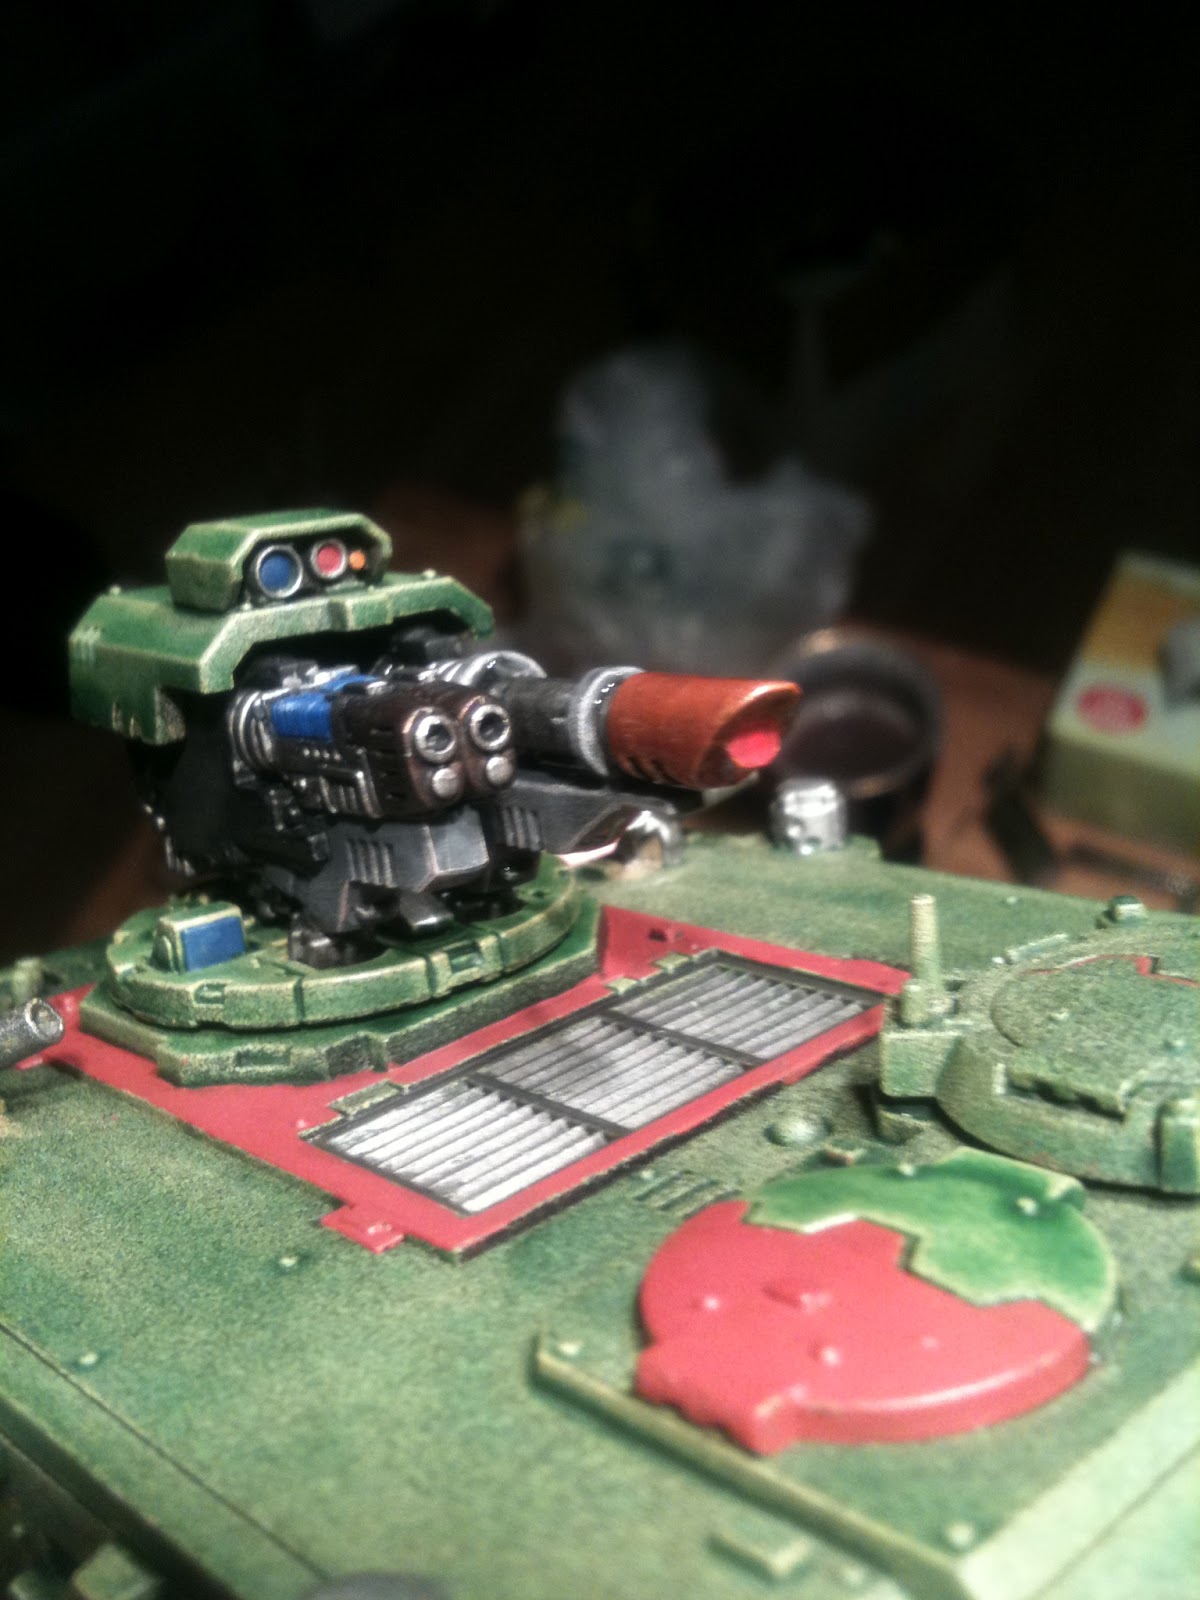
Glue the completed sensor to the missile launcher, making sure that the bottom of the two parts is nice and flush. Fill up the hole on the outside with green stuff and tidy it up. You may also want to file off the skull insignia - I think it looks a bit strange side on.

If you want to mount the launcher permanently, it's ready to glue on. If like me you're magnetising your tanks, flip it over and drop a magnet into the hole that's already there. Be careful to mark your magnet polarities.
Now drill a hole in the tank to take the corresponding magnet. I find that it sits quite nicely above the head lamps, but there's any number places you could put it.
And here's the finished article... It goes onto the tank with a satisfying snap. The magnet is visible when the tank is painted but I don't find it too offensive. You could make it invisible if you sunk it in a bit deeper and do some careful greenstuff-ing.
Whether or not HKs are worth the ten points is another question.. I'd probably go for a combi-weapon for the troops inside first with if I had the points spare. Anyway, if like me you want to be able to use all the possible options that the Rhino kit provides, this a good way of doing it.

Finally, a couple of observations on the picture I posted at the top, which shows my first go at this conversion. 1. After I took this picture I realised the sensor isn't painted properly! 2. This sensor has been glued the "default" way up for the kit, which means it looks a bit upside down when used in this conversion. I think new version picture above looks better.

Wednesday, 25 July 2012

Tips for Magnetising Rhinos, Razorbacks and Predators

I'm not going to do a full tutorial on magnetising a razorback so you can change over the weapon types and make it a rhino etc, because there are plenty of good ones out there already. I used these:

From the Warp: Magnetising the Space Marine STC

Pit of the Oni: Magnetising a Razorback

There are a couple of really useful tricks that I've worked out for myself while magnetising my tanks.

Marking Magnet Polarities with a File

A lot of the tutorials that I see suggest using spots of red paint to mark magnet polarities, and this works absolutely fine as long as you are patient enough to wait for the paint to dry. I've found myself using a file to mark polarities instead, which works immediately, and won't interfere with any glue joins either. Here's how to do it.

1. Take the piece that you've already fixed a magnet to, and stick an extra magnet to it. This magnet will eventually be glued to your new piece. In this case I'm working on a rhino door.


2. Take a file, and use it roughen the exposed side of the magnet. Often, the magnet will come off the model and end up sticking to the file instead. This is fine, because it should still be facing the right way, and you can then rub into the file by hand.


3. Now your magnet is ready to go onto your model. The rough side will be glued into the part you're working on leaving the smooth side ready to make a nice satisfying join with the part you've already finished. Even if you drop the magnet while you're working, the polarity is easy to work out by checking which is the rough side.

Be Consistent with Magnet Polarities and Positions


There's absolutely no reason why you shouldn't make each model you work on completely bespoke and put the magnets in different positions every time, but your life will be a lot easier if you are consistent.

For example, when working on tanks, I make all the magnets on the body one polarity, and all the removable parts the other. This means you don't need to keep checking polarities - each component can be "calibrated" against any magnet already mounted on the main body of the tank. If you extend this to your entire army, and are also consistent with magnet positions, it means that parts will be interchangeable between each tank and don't have to spend time looking in your case for exactly the right storm bolter or rhino hatch. In theory they should all fit.

Here I'm using a door from a completed rhino to mark magnet positions on a new one. The polarities will also be set using the completed door, making parts interchangeable between the two tanks.


Green Stuff
This one's dead simple. Add a little collar of green stuff on top of a magnet that's superglued in for extra durability.


Tank Storage
Another simple one. I like to put all the spare bits and pieces inside a tank when they're not in use. Just open up the magnetised rhino hatch and shove them in. One thing that won't fit is a Razorback turret when its not in use, but this is a handy way to make sure the little bits like storm bolters and hatch covers don't get lost.


Tuesday, 17 July 2012

Quick and Dirty Tanks

I'm building a Salamanders army using a quick and dirty technique that I picked up from miniwargaming.com via a friend. It's a great way of doing rank and file marines, and it works pretty well on HQ models too , but the big question is can it do tanks?

Because of the unusual way this technique works - putting a green wash over a model that's been partially sprayed yellow to make "automatic" highlights - the scale of the model that you are working on is massively important. Those big flat armour plates don't have much detail that the spray / wash technique can pick out, and there's also a risk that covering such a big area with a wash will lead to nasty blotches and uneven coverage.

So does it work? Well the answer is yes, just about. Here's a (mostly) finished rhino:


There aren't any really nice highlights brought out by the wash, but its still a really quick way to get a tank finished for the table. This tank won't win any prizes, but as its going to look great on the battlefield as part of wall of green armour. Incidentally, I know the tactical marking is facing the wrong way. This tank is magnetised and I painted the marking on without checking which way the hatch faced! Oops.

Here's the same tank in Razorback configuration:


This close up shows some of limitations of this scheme... the flat top of the tank is not totally even in colour, and because the tank is magnetised, the non-default parts have to be sprayed separately. The red and green hatch has ended up being a different green, because its received a different amount of yellow spray, and it has a different texture too.

On the other hand, the weapon housing has some nice auto-highlights. Where there are enough angles and details, this technique can look good on vehicles. I think a Stormtalon might work really nicely, and I'm planning to add one to this army eventually.


Here are couple of shots of the process being applied to rhino chassis. Firstly, here's the tank after it had its yellow spray. The uneven coat is deliberate - the variation in yellow coverage gives you the range of greens on the final model. With tanks, I find that its really important not to let flat area get a solid cover of yellow because the wash just won't stick to it.


Here's the green wash going on. Next time I do this it will go on with an airbrush which should result in much more even coverage, and should overcome one of the problems in applying this technique to tanks.


Overall, it just about works... which is good because I have another razorback, two predators and a landraider to get through before this army is finished!