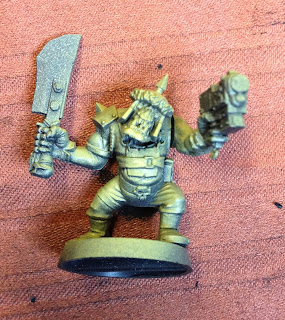
This is a mini that my pal Tony and I have worked on together. He likes trying fancy airbrushed-based schemes but never gets much finished. I can rarely be bothered with the airbrush, but do really like the results you can get with it, and I am very disciplined about getting models finished off, photographed and blogged. We realised that we could so some pretty interesting stuff between us and are working on a few minis together: he will do a fancy basecoat with an airbush and I will finished them off by hand and base them.
This is the first model that we've worked on together. It is one of about 120 plastic orks that live in a big pile in the Wargarage. One day when we had the airbrush out we grabbed the poor little sod and started experimenting on him!
Here's how he started life. Very much your common or garden plastic ork.
No prizes for guessing what happens next - a nice solid black undercoat. Vallejo black primer in this case.
Now the interesting part begins. The airbrush is loaded with a grey primer and sprayed from above to highlight some of the detail. It doesn't have to be a primer for this step, but that's what we had available and it works just fine.
Another layer of highlight is built up, this time using a yellow paint. This is a similar (but more advanced) version of the cheap and cheerful spray and wash technique that I use for my Salamanders. At the end of this step there is a really nice gradient in the model, from pure yellow on the raised areas down to pure black in the recesses. When the tint goes on this will produce a nice range of greens for the model's basecoat.
All this is the groundwork for the real star of the show - Minitaire Green Ghost Tint made by Badger. I am told that these paints were originally intended for work on cars. The result is a really striking, almost neon green which I think it suitably Orky.
I took over at this point to get the model finished. Firstly I blocked out some base colours in the parts that would no longer be green in finished model. The blade of the choppa is GW Boltgun Metal mixed 1:1 with black, his trousers are Vallejo USA Olive Drab (which I have for Flames of War models), and I could not resist using my current favourite Vallejo Hexed Lichen for the fur on his hat.
To give the the various browns and reds some depth, I gave most of the mini (excluding the skin) a coat of GW Devlan Mud. This is a bit tricky to pick up in a picture, but it is probably easiest to see in this back view.
Next I put a couple of simple highlights on and returned him to his base. His orky t-shirt, which started based in GW Khorne Red, gets a few touches of Vallejo Model Colour Scarlet to cheer it up a bit. The purple fur got a quick highlight with the basecoat mixed with white, and a blue wash to deepen the recesses. At this point I also decided that the choppa was a bit boring and decided to add some rust using GW Tin Bitz when I did the final basing and touch-ups.
This next view shows off how nicely the tint works on the flesh. The tops of the muscles are almost pure yellow, and there's a really nice range of greens going down picking out the details in the model.
This has been a really interesting project. This is the first ever ork model I've painted and it's been a lot of fun. I could not commit to doing 120 of these though! Working on top of the tint basecoat takes a bit of getting used to. It is a very glossy surface, and although acrylics do go on ok, they behave a bit differently to how they would usually. I am told that a coat of matt varnish after the tint helps to negate this effect, but that would take off the glossy "candy" finish of the tint which is part of the appeal. On the other hand you'd probably want to varnish the whole thing at the end, especially if it was going to have to stand up to game wear.
A word of warning. This is what happens if you do not wear gloves while airbrushing ork skin!
Our next airbrush projects are a 2nd edition Space Wolf Terminator and a Chaos Space Marine Chosen from the Dark Vengeance set. The Space Wolf is top of my list now so he should be ready soon.


No comments:
Post a Comment